It’s a cabinet!

I managed to get the sides all glued up and fit together.  Of course, there was a lot of fitting and fiddling necessary to get a solidly square case but its done.  Once again, my bench and its holding options come through.

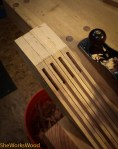
Now that the internal dados are also complete, I can start making the internal frame supports.

Jack Rabbet!

Made a little more progress on the desk and finished up the panels using my Jack Rabbet plane.  Once I got the panels to the right size, I beveled the edges to fit the grooves.  

Tomorrow, it’ll actually start lookin’ like a cabinet.

This is a post I really want to remember so I’ve reblogged it.

R & B ENTERPRISES's avatarPlane Shavings Blog

When fettleing a plane for the first time a lot of attention is usually paid to the iron, or blade, and rightfully so because no matter what else you do to a plane if the iron is not sharp the plane won’t function at it’s best.

The next most important part in the process is the cap iron, commonly known as the chip breaker. This part must fit the back of the iron perfectly with absolutely no gaps between it and the iron. The slightest gap between the back of the iron and the cap iron will catch a shaving eventually choking the plane mouth.The next operation on the cap iron is honing the face where it meets the back of the iron. Until recently I always honed this angle to 45 degrees, but I have learned differently, and in a moment I will share what I have learned.

When…

View original post 792 more words

Getting Even

I’ve been putting grooves in the internal frames pieces and finishing up the frame and stile parts for the case sides.  

I needed to cut the angled feet.  The gallery below tells how I cut and finished the feet.